How to Install Oracle 12c on Windows 10
Hardware and Software Requirements
Before installing the software, OUI performs several automated checks to ensure that your computer fulfills the basic hardware and software requirements for an Oracle Database installation. If your computer does not meet the requirements, an error message is displayed. Some of the requirements to install the software are:
- Minimum 2 GB of physical memory
- Sufficient virtual memory (swap)
- At least 10 GB of free disk space
Prerequisites
Before starting this tutorial, you should:
- Have access to the Oracle Database 12c distribution media, or have an internet connection so that you can download the software
- Have general knowledge of product installation
How to connect to Oracle Database from Visual Studio
Download and Installation of Oracle 12C
- First Download Oracle 12c from Oracle Website https://www.oracle.com/database/technologies/database12c-win64-downloads.html
- Once downloaded, Extract the ZIP file to specific folder


The Configure Security Updates window appears. Enter your email address and My Oracle Support password to receive security issue notifications via email. If you do not wish to receive notifications via email, deselect “I wish to receive security updates via My Oracle Support“. Click Next to continue. Click “Yes” in the confirmation window to confirm your preference.


The Oracle Home User Selection window appears. Starting with Oracle Database 12c Release 1 (12.1), Oracle Database on Microsoft Windows supports the use of an Oracle Home User, specified at the time of installation. This Oracle Home User is used to run the Windows services for a Oracle Home, and is similar to the Oracle User on Oracle Database on Linux. This user is associated with an Oracle Home and cannot be changed to a different user post installation.
Note:
- Different Oracle homes on a system can share the same Oracle Home User or use different Oracle Home Users.
- The Oracle Home User is different from an Oracle Installation User. The Oracle Installation User is the user who requires administrative privileges to install Oracle products. The Oracle Home User is used to run the Windows services for the Oracle Home.
The window provides the following options:
- If you select “Use Existing Windows User“, the user credentials provided must be a standard Windows user account (not an administrator).
- If this is a single instance database installation, the user can be a local user, a domain user, or a managed services account.
- If this is an Oracle RAC database installation, the existing user must be a Windows domain user. The Oracle installer will display an error if this user has administrator privileges.
- If you select “Create New Windows User”, the Oracle installer will create a new standard Windows user account. This user will be assigned as the Oracle Home User. Please note that this user will not have login privileges. This option is not available for an Oracle RAC Database installation.
- If you select “Use Windows Built-in Account”, the system uses the Windows Built-in account as the Oracle Home User.
Select the Create New Windows User option. Enter the user name as OracleHomeUser1 and password as Welcome1. Click Next.
Note: Remember the Windows User password. It will be required later to administer or manage database services.


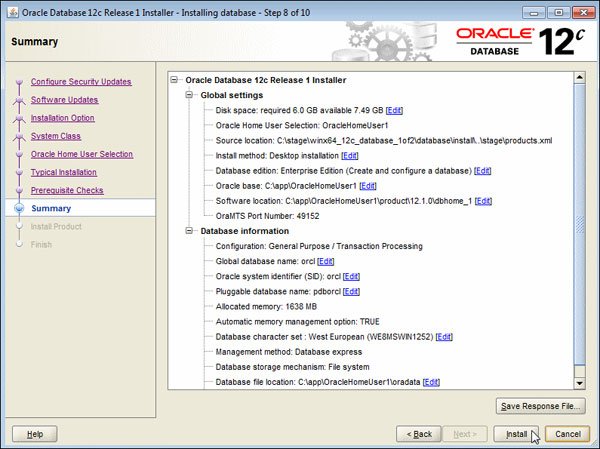
The Typical Install Configuration window appears. Click on a text field and then the balloon icon to know more about the field. Note that by default, the installer creates a container database along with a pluggable database called “orclpdb“. The pluggable database contains the sample HR schema. Change the Global database name to orcl. Enter the “Administrative password” as Oracle_1. This password will be used later to log into administrator accounts such as SYS and SYSTEM. Click Next.

· Leave the Values as it is and enter password of your choice. And click Next. This is the password will be used to connect the default database(Default usernames: SYS , SYSTEM , PDBADMIN )


After the Database Configuration Assistant creates the database, you can navigate to https://localhost:5500/em as a SYS user to manage the database using Enterprise Manager Database Express. You can click “Password Management…” to unlock accounts. Click OK to continue.
The Finish window appears. Click Close to exit the Oracle Universal Installer.
Connect to oracle using Command Prompt
Open a command prompt and execute the following command. This command uses SQL*Plus to connect to the pluggable database as a system administrator:
sqlplus sys/Oracle_1@pdborcl as sysdba;
Note: If you had chosen a different administrative password during installation, replace Oracle_1 with the appropriate password in the command.


Execute the following commands to connect to the HR schema in the pluggable database and query the EMPLOYEES table.
connect hr/hr@pdborcl
select count(*) from employees;

The EMPLOYEES table contains 107 rows. This verifies that the HR schema was created successfully when the database was installed.
